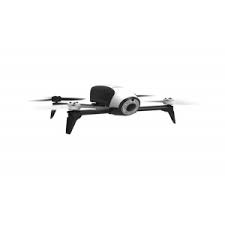
parrot ar drone unable to join network

In my parrot ar.drone its just showing red light in all four corners and is not creating wifi hotspot to connect with remote. if any one could help me with this solving. Try to fully charge the battery. Once you have done this on the AR Drone push the un-pair button then push the 'reset' button and place the AR Drone on a flat level surface and unplug the battery. On the iPod/device go to the WiFi menu tap on the AR Drone and select 'Forget this device'. Reconnect the battery on the AR Drone and wait for the leds to go green. Put your iPod into Airplane mode, switch on the WiFi and try to reconnect to the AR Drone. If the led's on your AR Drone are green and you are still unable to connect can you try resetting your iPod/device . You might have it on access-point mode, which is for Android users like me, i had the same problem and turned out it was on Ad-hoc mode, which is for Apple users. Hold down the unpair button for 5 sec. The LEDs flash red when access-point mode is switched to ad-hoc mode.
The LEDs flash green when ad-hoc mode is switched to access-point mode I've also read that wireless camera systems can interfere with the signal. AR Drone help desk said that the all red on all 4 rotors means there's a problem on the main board. hopefully you get them running again, Good Luck! Hello I was using Free fly 3 & I was making with thee setting & hit 24hz & 60hz then it say All I hit all & now no wifi signal Just reset the drone :)The guide will help you to get started with NodeCopter hacking in any All NodeCopter hacking is done using the Parrot AR Drone The AR Drone 1.0 may also be supported by some libraries, but most of the community uses 2.0 drones. We are not married to the Parrot drones, but so far we have not found any alternatives that offer competitive pricing, automatic hovering, global distribution, easy repairs and are shipped fully assembled. In most countries the best place to buy a drone is your national version of

won’t get a discount, but shipping is usually very fast and they often also carry the repair parts you may need. If Amazon is not a viable option for you, you should consider the manufacturers Shipping can be slow, but they can deliver all parts to almost any country in For those willing to go the extra mile for a good deal, we recommend Ebay orYou can often find used drones or drones with minor damage. Repairing the drones is easy, so unless the damage is much bigger than advertised, you should be able to save a decent amount of money. Last but not least, there are several brick and mortar retailers, you can find Before starting your drone for the first time, you may want to know about this: Make sure that you have Node.js installed. First off, you should get the FreeFlight app for your iOS device if you don’t have it already. Now connect to the drone’s WiFi with your smartphone, start the FreeFlight app and make a test flight with it’s Piloting feature to learn how the drone behaves.

It’s also a good time to check if the firmware of the drone is up to date. setup the drones for exact instructions. But controlling the drone with the phone is boring, let’s program it! the drone’s WiFi with your laptop and install the ar-drone module: Once you’ve done that, save this to a file:See how your drone takes of, rotates clockwise and even does a flip!Now you’re set, go ahead and get crazy!
ar drone too much angle emergency Per default, the drone will only fly very slowly and won’t fly higher than 3m.
parrot ar drone patent These limits can be lifted via the mobile app or a library that supports it.
facebook looking into buying drone maker titan aerospace
Here is an example for setting the limit to 100m using the Looks like the emergency mode is in effect. To easy ways to fix this: Normally, if you’re connected to your drone’s WiFi you don’t have connection toThis is not very convenient, so an easy way out is letting the AR drone connect to a WiFi accesspoint. Connect to an open network If you have access to an open network (no WPA or similar), you can simply:iwconfig ath0 mode managed essid [ssid]; ifconfig ath0 [wanted ip] netmask 255.255.255.0 up; Thank you @karlwestin for this gist. Connect to a network secured with WPA In order to connect to a secure network, you need to install WPA support on your drone. The good news is that @daraosn took the time to cross-compile wpa_supplicant and write some handy install scripts. Just checkout the ardrone-wpa2 repo on githbub and follow the instructions there. Check out this gist so see how to connect an Arduino to a drone!

Have you written a nodecopter module? Add it by editing this NodeCopter Modules on npm Might take some time on first load Module must be on npm with `nodecopter` in the name or description.Discover the Parrot Jumping Sumo, a connected robot with a strong personality. With it, each element of your surroundings becomes a challenge. First, you need to download the free app (Freeflight 3) on your smartphone or your tablet. Please launch FreeFlight 3 app with internet connection (Wifi or 3G), then go to the menu “Update” . If a new version of the firmware is available, it will be detected and downloaded automatically. Then, when you will reconnect to the Jumping Sumo wifi, you can launch the downloaded update file. /support/parrot-jumping-sumo Choose the latest version, click download and put the file into a Mini-usb key. Then, just connect the mini-usb key to your Jumping Sumo to make the update and leave your robot a short moment until it restarts.

Now, open the Freeflight 3 app. Check if your Jumping Sumo is updated and start piloting by tapping “start” button on the home screen. If your smartphone does not support connection to the 5GHz Wi-Fi band, you have the option of manually switching the network generated by the Parrot Jumping Sumo to the 2.4GHz Wi-Fi band without using the application. To do this, press down for 3 seconds on the On/Off button. Freeflight 3 has a minimalist and intuitive new interface. On the piloting screen you can find: Jumping Sumo is very easy to pilot To make your robot drives forward or back, just slide your thumb on the left joystick. To control the direction of the Jumping Sumo, tilt your smartphone or tablet to the left and the right. You can turn very fast if you go likes this and be precise if you tilt very slightly. To make a quarter turn in less than a second, swipe with your finger on the right side of the screen. Also, swipe your finger up and down (on the right side of the screen) to make a 180 ° turn (u-turn).

It is also possible to jump during movement. For this, pre-charge the jump by sliding “long jump” icon on the left. Then trigger the jump by tapping the long-jump button while the drone is moving. Jumping Sumo has adjustable wheels for 2 piloting experiences: The wheels open give Jumping sumo a greater stability in high-speed. But if you re-tract them, it enhance agility and allows you to drive through narrow areas. Jumping Sumo has 3 piloting modes: Jumper, Kicker and Autobalance. By pressing once on this button the Jumping turns back. And staying press on this button, the drone switches to autobalance mode that allows you to ride on uneven surface such as carpet, bed… You can use the power of the Jumping to kick objects. To do this, sets the jumping backwards and precharge a jump before an object. Finally activate the jump to shoot in it. Several fun animations are prerecorded in the jumping sumo. To activate them, go into the animation menu and select one.